|
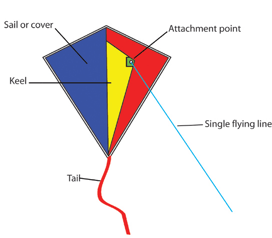
How to string a kite diagram. |
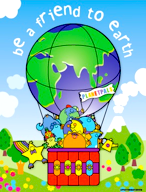
Teach Kids to Love and Care for Earth Recycle Craft!
At Planetpals we believe if you teach kids to appreciate beautiful things on Earth, they will learn to love and care for it! It's that simple.
Recycle Everyday Objects
Great craft for a school lesson plan, girl scouts, boy scouts or home project |
| |
| |
| |
| Step 1 |
|
| Step 2 |
|
| Step 3 |
|
| Step 4 |
|
| Step 5 |
|
| Step 6-Add string and Play! Ages 4 or 8 it's great! |
| |
| |
Looking for more interactive things to make here at Earthzone?
Every issue of our magazine has a special craft of the month! Free Activities in your email from the kidsclub! Try the Planetpals coloring page, recycle kit, card game, or check out our freebeez page. |
Make another craft! |
Make Recycle Paper Kite from A Drawing!
Make Recycle Kite Using One Sheet of Paper:
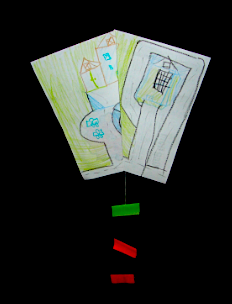
At home or at school this craft is cool!
A lesson in simple toy engineering and recycled paper. A reminder of the importance of trees and not wasting paper.
Make a custom kite--we suggest recycling a drawing!
How to make this Kite:
Tools needed:
- 81/2 x 11 Paper
- Glue
- Tape
- Hole Punch
- Scissors
- Paint , markers, (optional)
- String
- Sticks (chopsticks, kabob sticks, twigs)
Directions for this Kite
- Lay your paper down horizontally. Place the long sides of the paper on top and bottom. This will help you get ready to make your own paper kite.
- Fold the paper in half and leave it folded. Do not unfold or your kite will not be a success.
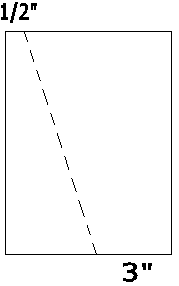
- Mark a point on the top edge 1/2-inch (12mm) in from the center fold.
- Mark a point on the bottom edge 3 inches (7.5 cm) in from the other side.
- Draw a line between the two points. Fold along this angled line.
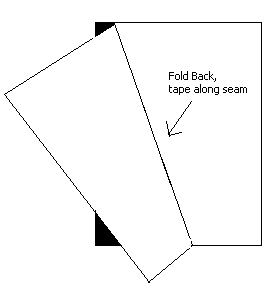
- Pinch the first fold (the one straight down the center) to hold it closed, as you fold back the wings along the second, angled fold line. You now have the basic shape of the kite.
- Secure it together with a line of tape down the seam between the wings.
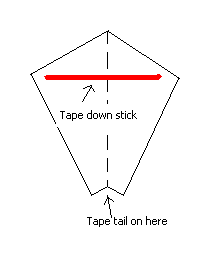
- Tape your stick across the top of the wings, horizontally, in line with the side points.
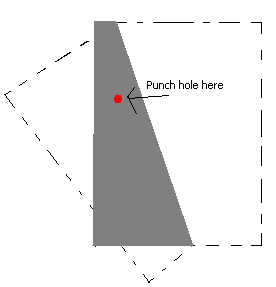
- Use a hole-puncher to make a hole in the bottom flap, about one third of the length from the narrower end of the flap (top of kite).
- Tie your kite string through the hole. Secure with a firm but gentle knot.
- Make a tail. This can easily be achieved by taping a length of ribbon, plastic tape,strips of newspaper,etc. to the bottom end of the kite.
Options / Ideas:
- Use the other side of old schoolwork
- Make your own drawings
- Draw favorite characters
- Paint and decorate
Make another craft!
This craft is ©Jag planetpals.com reproduction restricted |

