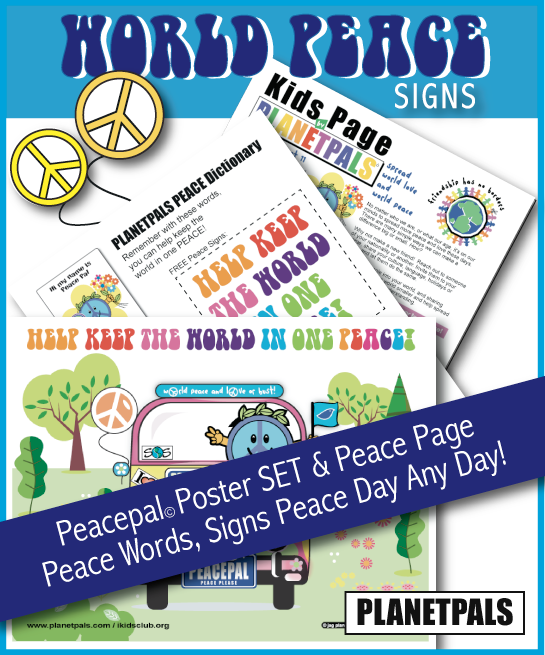
Friendship Bracelet Day!
Friendship bracelet day is usually in the month of February, the month of
St. Valentines Day. Any day is a good day to give a friendship bracelet to let someone know you care...but perhaps it has a significant meaning during this month. Why not give a PEACE bracelet during September when Peace Day occurs on Sept
21.
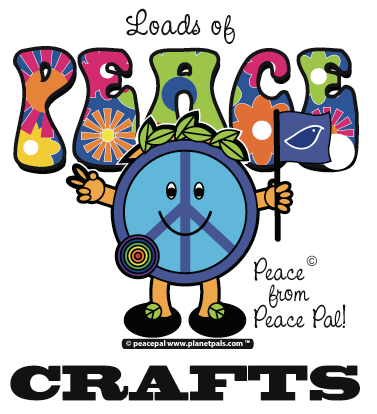
Make Peace & Friendship Bracelets |
A "Friendship" or "Peace" Bracelet is a great craft.
Weaving is a craft known around the world in all cultures throughout time. From making cloth for clothing to nets for fishing, this art has been, and still is, an important part of everyone's life. The FRIENDSHIP BRACELET is a weaving project that you can make and send to all your friends. Wearing the bracelet around their wrist or ankle will let them know you care.
Peace bracelets are a great craft for children of any age! Each bracelet can be as simple or as complicated as you wish--we have ideas for variations or embellishments.
NOTE: For younger children (ages 4-7) a twist or braid is easiest. Use a thick yarn as the stands will be easier to control. For older children: Choose from many stitches, braids and weaving patterns.
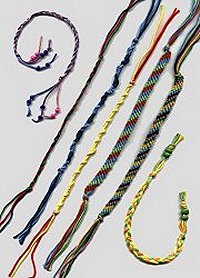
We have Three bracelet types with instructions BELOW.
Bracelet Ideas
- Why not use recycled materials!
- Use one color throughout or several colors.
- Use as many strands as you like depending on the thickness and style. The simplest starts with 3.
- Why not tie two or three bracelets together!
- Add fun beads or special items from fun times together
- Add word beads! A friends name, a special group name, a birth date, a special message such as "peace please"
- Add a peace dove, world or peace symbol . There are lots of ideas at the craft store
- Make it patriotic-use your country's colors (I.e.: USA -Red, white and blue)
- Some techniques use straws or knitting or crochet needle to wrap the yarn around
- See what you can find in books or on the web
What you need to get started
• Thick or thin THREADS (yarn , embroidery thread, gimp, twine, use your imagination!) The number of strands depends on the style you choose.
• a pair of scissors
• masking tape or other
• measuring tape or ruler
• lots of patience
Basic Techniques:
Step 1:
Cut THREADS that are 24 inches long.
Step 2
Hold your bracelet in place while you work on it. You cant it to a fence, a bedpost or a chair. You can tape it to the table or clip it to a notebook loop. Just so long as it hangs.
Step 3
Remember the bracelet begins and ends with a simple knot. Once you've woven the bracelet you want there are two easy ways to tie it closed.
* if the bracelet has a looped end, pull the loose ends through the loop and tie a simple square knot.
* if the bracelet has loose ends, tie them with a square knot.
|
Three Bracelet Styles:
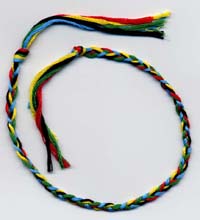
1. The Twisted bracelet
This bracelet starts off as one twist and turns into two by itself!
Step 1
The basic twist uses 3 strands of THREADS but you can use 4 or more! (three colors of thread is nice but not necessary) each 24" inches (60 cm) long and tie them together with a knot.
Tape them to a table or clip them to the edge of a notebook or other surface.
Step 2
Hold the strings together and twist them.
Twist and twist until the twist is about 17 inches long.
Step 3
Hold the twist with one hand.
Put a finger from your other hand in the middle of the twist and fold it.
Step 4
Take your finger out of the middle and the twist will twist around itself. If the double twist kinks, smooth it out by pulling the looped end...caution! Don't pull too tightly!
Step 5
Tie the loose ends with a knot. To close the bracelet, open the loop at the end, thread the string through and tie with a square knot.
2. The Braided Bracelet:
This bracelet can be braided into a simple braid, just like you do your hair , or braided into complicated patterns.
Step 1
The basic Braid uses 3 strand of THREADS. (three colors of thread is nice but not necessary) each 24" inches (60 cm) long. and tie them together with a knot.
Step 2
Tie a knot in the top by looping the string around a finger and making a square knot.
Put the same colored strings together to make three thick strands.
Tape the loop to a table top or clip the end to a notebook.
Steps 3 and 4
Now, braid, just like you would braid hair!!!
(the outer string always crosses the middle string, and then becomes the middle string)
Pull the braid tightly as you go along.
You may want to use more tape to hold the strings in place as you go.
Step 5
When the braid is long enough to fit around your wrist, tie the loose ends with a knot.
To tie the bracelet around your wrist, pull the knotted end through the loop and tie a square knot.
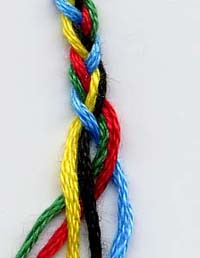
3. The Woven Bracelet
You can weave thicker bracelets using patterns such as Indian patterns. Thebasic starts with * 6 strands of yarn , embroidery thread, gimp, twine, whatever you like- each 24" inches (60 cm) long.
* An easy way to think of this woven pattern is to imagine that each strand represents a letter in the word F R I E N D
(* You may choose any colors you like.)
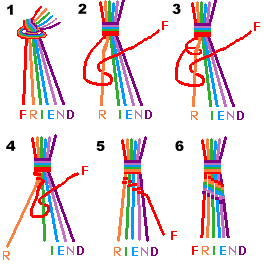
Step 1
Gather the 6 ends and tie an overhand knot leaving a 8" - 9" (21-23 cm) tail. Arrange them in the order you would like for your bracelet. Tape knotted end to a table or tie to a chair.
Step 2
Take the first string on the left F and wrap it over and around the next string R to make a knot. Tighten by holding R and pulling up on string F.
Step 3
Make a second knot the same way with string F over and around string R. Pull up on F to tighten.
Step 4
Now drop string R and pick up string I. Make two knots with string F over and around string I.
Step 5
Repeat on strings E, N, and the last string D making two knots on each with string F. Now F will be on the right. This makes one complete row.
Step 6
Continue the next row by taking the first string on the left, now string R, and making two knots over and around each of the other strings I, E, N, D and F. With each row the string on the left is worked over to the right side.
Step 7
When you have woven enough to fit around your wrist, tie another overhand knot to complete. To wear the bracelet, tie the two ends together in a square knot and trim the extra strings.
|


 Visit Planetpals. Com Friends for Earth